목차
TORCH.UTILS.DATA.DATASET
TORCH.UTILS.DATA.DATALOADER
TORCHVISION.TRANSFORMS
※ 파이토치를 이용한 딥러닝 구현 흐름
TORCH.UTILS.DATA.DATASET
Pytorch는 Dataset 클래스를 상속 받아 Custom Dataset 클래스를 만들게 한다.
class Dataset(object):
    """An abstract class representing a Dataset.

    All other datasets should subclass it. All subclasses should override
    ``__len__``, that provides the size of the dataset, and ``__getitem__``,
    supporting integer indexing in range from 0 to len(self) exclusive.
    """

    def __getitem__(self, index):
        raise NotImplementedError

    def __len__(self):
        raise NotImplementedError

    def __add__(self, other):
        return ConcatDataset([self, other])
예시) Dataset을 상속받은 Custom Dataset 클래스(Map-style dataset) 예시
- Map-style dataset 이므로 __getitem__ 과 __len__을 선언하였다.
class MnistDataset(Dataset):
    def __init__(self, dir: os.PathLike, image_ids: os.PathLike, transforms: Sequence[Callable]) -> None:
        self.dir = dir
        self.transforms = transforms
        self.labels = {}
        with open(image_ids, 'r') as f:
            reader = csv.reader(f)
            next(reader)
            for row in reader:
                self.labels[int(row[0])] = list(map(int, row[1:]))
            self.image_ids = list(self.labels.keys())

        #print(self.image_ids)

    def __len__(self) -> int:
        return len(self.image_ids)

    def __getitem__(self, index: int) -> Tuple[Tensor]:
        image_id = self.image_ids[index]
        image = Image.open(os.path.join(self.dir, f'{str(image_id).zfill(5)}.png')).convert('RGB')
        #print(image.size) #(256, 256), grayscale, float32
        target = np.array(self.labels[image_id]).astype(np.float32)

        if self.transforms is not None:
            image = self.transforms(image)

        #print(image.size()) #torch.size([3, 256, 256])
        return image, target
※ __getitem__는 객체를 Slicing 하여 호출할 경우 호출되는 특수 메소드이다.
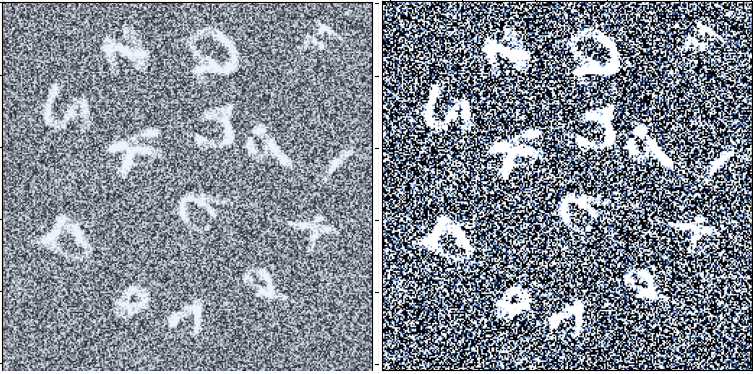
※ 데이터를 학습 전에 출력해볼 경우(Dataset 클래스)
아래 코드는 데이터를 학습 전에 미리 출력해보기 위함이다(학습될 데이터를 미리 확인해 보는 것은 중요하다).
특이한건, 이미지를 불러 올때는 Pillow 라이브러리를 이용하고(Image.open), transform을 거치고 나면, torch.FloatTensor으로 자료형이 변형되었으니 Pillow의 image를 보여주는 메소드인 image.show()를 사용하지 못한다.
따라서, MatplotLib의 imshow() 라이브러리를 이용한다. 하지만,torch.FloatTensor 가 (C, H, W)이므로
(H, W, C)로 바꿔준다. 따라서, 다음과 같은 두가지 방식이 있음을 결론 지을 수 있다.
1) plt.imshow(trainset[i][0].permute(1, 2, 0).numpy())
- 꼭 numpy() 자료형으로 안바꿔 줘도 되긴한다. plt.imshow(trainset[i][0].permute(1, 2, 0)) 도 가능하다[3].
2) plt.imshow(np.transpose(trainset[i][0], (1, 2, 0)))
trainset = MnistDataset('D:\data_2\dirty_mnist', 'D:\data_2\dirty_mnist_answer.csv', transforms_train)

for i in range(trainset.__len__()):
    if i % 100 == 0:
        #print(trainset[i])
        #print(trainset[i][0].size()) #torch.size([3, 256, 256])
        #print(trainset[i][0].type()) # torch.FloatTensor
        #plt.imshow((trainset[i][0]).permute(1, 2, 0).numpy()) # 첫번째 방법
        plt.imshow(np.transpose(trainset[i][0], (1, 2, 0)))    # 두번째 방법
        plt.show()
※ 데이터가 표현 가능한 값의 범위를 넘어갈 경우
- 예를 들어 (-81, 317) 혹은 (-2.5, 3.9) 의 범위를 가질 경우
- Matplotlib은 float32, uint8 자료형을 처리할 수 있다. GrayScale의 경우 Matplotlib은 float32만 처리 가능하다[1].
- Pillow는 uint8 데이터를 처리 가능하다.
- 범위를 잘 지켜주지 않을 경우 아래의 경고 메시지를 만날 수 있다.
==> 'Clipping input data to the valid range for imshow with RGB data ([0..1] for floats or [0..255] for integers)'
즉, 이미지 데이터는 (-255, 255) 혹은 (-1, 1)의 범위를 넘어서 값을 가질 수 있다. 따라서, 데이터를 픽셀간 거리 비율을 유지하면서, 전치리를 잘 해줘야 한다. 그리고 0-1float 혹은 0-255int 범위로 바꿔줘야 한다.
Image = Image/np.amax(Image) # np.amax는 배열의 가장 큰 값을 반환한다. Image는 (-1 ~ 1) 범위를 가진다.
# image = (image/np.amax(image) + 1)
# image = image/np.amax(image)
Image = np.clip(Image, 0, 1) # np.clip은 0보다 작은 값은 0으로, 1보다 큰 값은 1로 바꿔준다.
plt.imshow(Image)
※ 본인의 시도
- 본인은 image/np.amax(image)가 (-1 ~ 1) 범위를 가지니까, (0 ~ 2) 범위로 만들어 주기 위해 +1을 하고,
- 다시 np.amax(image)로 나눠줘야 값이 (0 ~ 1)를 가지면서, 픽셀 간의 범위가 그대로 유지 되는 것이 아닌가 하고 생각하였다.
(위의 코드에서 추가해준 부분)
image = (image/np.amax(image) + 1)
image = image/np.amax(image)
- 하지만, 어느 것이 더 나은지는, 데이터 특성에 따라 다르다고 할 수 있겠다[5].
TORCH.UTILS.DATA.DATALOADER
- 말그대로 데이터 로더(분배기), tqdm과 주로 같이 쓰인다.
- 호출할 때마다, 위에서 정의한 Custom Dataset을 옵션에 맞게 호출한다.
- Pytorch는 두가지 타입의 데이터 셋을 지원한다. 'map-style datasets', 'iterable-style datasets'
- map-style-dataset은 dataset['label'] = 라벨, dataset['image'] = 이미지 와 같이 매핑되어 있는 형태를 말한다.
: __getitem__ 과 __len__ 선언이 필요하다.
- iterable-style datasets은 __iter()__ 매소드를 오버라이팅하여 호출 시마다, 다른 데이터 셋을 불러올수 있는 구조를 뜻한다.
DataLoader(dataset, batch_size=1, shuffle=False, sampler=None,
           batch_sampler=None, num_workers=0, collate_fn=None,
           pin_memory=False, drop_last=False, timeout=0, worker_init_fn=None,
           *, prefetch_factor=2, persistent_workers=False)

# 사용예시
trainset = MnistDataset('D:\data_2\dirty_mnist', 'D:\data_2\dirty_mnist_answer.csv', transforms_train)

train_data_loader = DataLoader(
    trainset,
    batch_size = 8,
    shuffle = True,
    num_workers = 3
)
※ sampler vs batch_sampler
sampler
: 데이터 셋에서 샘플을 추출하는 전략을 정의. __len__이 구현된 모든 Iterable이 들어갈 수 있다. sampler를 정한 경우,
shuffle이 지정되지 않아야 한다.
: map-style 데이터 셋에서 sampler는 사용자가 정의하거나, shuffle 인자로 정의할 수 있다.
batch_sampler
: sampler와 비슷하지만, 한번에 인덱스 배치를 반환한다 (batch_size + sample 역할을 한다고 보면 될듯하다)
: batch_size, shuggle, sampler, drop_last와 상호 배타적이다 (같이 쓸 수 없다는 뜻 일듯 하다)
※ 데이터를 학습 전에 출력해볼 경우(DataLoader)
- iter 와 next를 이용한다
target_feature, train_labels = next(iter(train_dataloader))
print(f"Feature batch shape: {train_features.size()}")
print(f"Labels batch shape: {train_labels.size()}")
img = train_features[0].squeeze()
label = train_label[0]
plt.imshow(img, cmap="gray")
plt.show()
print(f"Label: {label}")

'''
Feature batch shape: torch.Size([64, 1, 28, 28])
Labels batch shape: torch.Size([64])
Label: 9
'''
※ DataLoader 옵션 추가글
1) num_workers에 관한 고찰
- https://jybaek.tistory.com/799
DataLoader num_workers에 대한 고찰
Pytorch에서 학습 데이터를 읽어오는 용도로 사용되는 DataLoader는 torch 라이브러리를 import만 하면 쉽게 사용할 수 있어서 흔히 공식처럼 잘 쓰고 있습니다. 다음과 같이 같이 사용할 수 있겠네요. fr
jybaek.tistory.com
- 간단하게 말하면, CPU 코어 갯수의 절반 정도를 num_workers에 할당한다.
예를 들어 옥타코어의 경우 num_workers = 4
- 다른 글
2) pin_memory 옵션
- https://discuss.pytorch.org/t/when-to-set-pin-memory-to-true/19723
When to set pin_memory to true?
From the imagenet example: train_loader = torch.utils.data.DataLoader( train_dataset, batch_size=args.batch_size, shuffle=(train_sampler is None), num_workers=args.workers, pin_memory=True, sampler=train_sampler) val_loader = torch.utils.data.DataLoader( d
discuss.pytorch.org
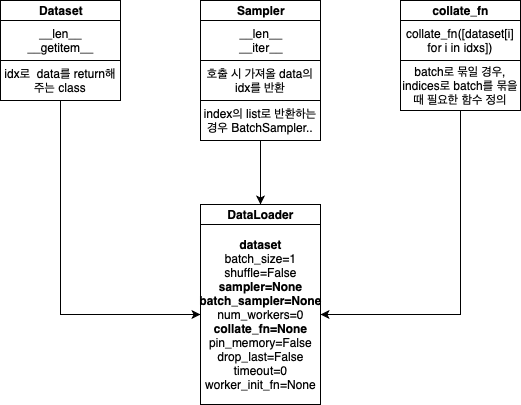
※ collate_fn
: sampler로 부터 인덱스를 이용해서 샘플 리스트를 가져온 아후에, 함수(?)는 collate_fn 인수로 들어가는 함수는 배치로 들어가는 샘플 리스트를 수집할 목적으로 사용된다.
: 해당 경우 map-style 데이터셋으로 부터 로딩하는 것은 다음과 같다
for indices in batch_sampler:
    yield collate_fn([dataset[i] for i in indices])
: iterable-style 데이터셋으로 부터 로딩하는 것은 다음과 같다
dataset_iter = iter(dataset)
for indices in batch_sampler:
    yield collate_fn([next(dataset_iter) for _ in indices])
collate_fn을 사용하는 것은 자동 Batching이 켜져 있을 때랑, 안 켜져 있을 때가 조금 다르다.
자동 Batching이 안 켜져 있을 때는, collate_fn이 각 데이터 샘플과 함께 호출된다. 출력은 dataLoader 이터레이터로 부터 나온다. 디폴트 collate_fn은 단순 Numpy 배열을 Pytorch 텐서호 변환한다.
자동 Batching이 켜져 있을 때는, collate_fn이 데이터 샘플 리스트와 함께 호출된다. 데이터 로더 반복자에서 생성하기 위해 입력 샘플을 배치로 조합할 것으로 예상된다.
예를 들어, 각 데이터 샘플이 (3채널 이미지: image, 클래스 라벨: class_index)로 이루어질 경우, 디폴트 collate_fn은 튜플 리스트를 하나의 배치 이미지 텐서에 대한 단일 튜플과 배치 라벨 텐서로 수집한다.
: 새로운 차원은 배치 차원이다
: Numpy 배열과 수치 값을 자동으로 파이토치 텐서로 변환한다
: 데이터 구조를 보존한다. 즉, 각 샘플이 'Dictionary'인 경우, 동일한 Key 세트를 사용하지만 Batched 된 텐서로 Dictionary를 출력한다. 리스트, 튜플, named튜플 모두 동일하다.
TORCHVISION.TRANSFORMS
- Transforms은 Image Augmentation을 위한 TorchVision에서 제공하는 모듈이다.
- Transforms은 아래 3가지를 입력으로 받을 수 있다.
1) Tensor Image : (C, H, W)
2) Batch of Tensor Images : (B, C, H, W)
3) PIL Image
아래 예시는 RandomResizedCrop(resize, scale=(0.5, 1.0))을 적용하였다. 0.5 ~ 1.0 크기로 이미지를 스케일링한다.
화면 비율을 3/4, 4/3중 하나로 변경해(?) 이미지를 가로 혹은 세로로 늘리고 마지막으로 resize한 크기로 자른다.
다양한 데이터를 학습하여, 테스트 데이터에 대한 성능 개선에 도움이 된다.
# 입력 화상의 전처리 클래스
# 훈련시와 추론시 처리가 다름
class ImageTransform():
    """
    화상 전처리 클래스. 훈련시, 검증시의 동작이 다르다.
    화상 크기를 리사이즈하고, 색상을 표준화한다.
    훈련시에는 RandomResizedCrop과 RandomHorizontalFlip으로 데이터를 확장한다.

    Attributes
    ----------
    resize : int
        리사이즈 대상 화상의 크기.
    mean : (R, G, B)
        각 색상 채널의 평균 값.
    std : (R, G, B)
        각 색상 채널의 표준 편차.
    """

    def __init__(self, resize, mean, std):
        self.data_transform = {
            'train': transforms.Compose([
                transforms.RandomResizedCrop(
                    resize, scale=(0.5, 1.0)),  # 데이터 확장
                transforms.RandomHorizontalFlip(),  # 데이터 확장
                transforms.ToTensor(),  # 텐서로 변환
                transforms.Normalize(mean, std)  # 표준화
            ]),
            'val': transforms.Compose([
                transforms.Resize(resize),  # 리사이즈
                transforms.CenterCrop(resize),  # 이미지 중앙을 resize × resize로 자른다
                transforms.ToTensor(),  # 텐서로 변환
                transforms.Normalize(mean, std)  # 표준화
            ])
        }

    def __call__(self, img, phase='train'):
        """
        Parameters
        ----------
        phase : 'train' or 'val'
            전처리 모드를 지정.
        """
        return self.data_transform[phase](img)
※ PNG 이미지의 읽기/쓰기는 uint8로 제한된다.
※ torchvision.transforms.functional 모듈은 Transformations 을 더 세밀하게 제어할 수 있다(e.g. Segmentation)
[1] matplotlib.org/tutorials/introductory/images.html
[2] pytorch.org/docs/stable/_modules/torch/utils/data/dataset.html#Dataset
[3] discuss.pytorch.org/t/how-to-visualize-display-a-data-image-in-torch-floattensor-type/7770
[4] www.kaggle.com/c/ann-and-dl-image-segmentation/discussion/120550
'데이터 과학 > 딥러닝 FrameWork' 카테고리의 다른 글
| RNN & LSTM 설명 및 구현(pytorch) (0) | 2021.03.29 |
|---|---|
| 모델 앙상블(ensemble) 하기 (0) | 2021.02.26 |
| Trouble Shooting (0) | 2021.01.31 |
| Torch 연산 (0) | 2021.01.29 |
| Pytorch with examples (0) | 2020.12.14 |


